When you work with scale factor exercises on a coordinate plane, you are practicing how shapes change size while keeping their proportions intact. This skill shows up in middle school geometry, high school transformations, and technical fields like drafting and digital design. Learning to enlarge figures using a grid gives you a clear, visual way to track how every point moves when you apply a multiplier. Instead of guessing, you follow a repeatable process that builds confidence with geometric dilations and proportional reasoning.
How do you enlarge a shape using a scale factor on a coordinate grid?
The process starts with your original figure, often called the pre-image. Write down the coordinates of each vertex. Choose a center of dilation, which is usually the origin (0,0) for beginner exercises. Multiply both the x and y values of each point by your scale factor. If the factor is greater than 1, the shape grows. Plot the new points, connect them, and you have your enlarged image. For example, a triangle with vertices at (2,1), (4,1), and (2,3) enlarged by a scale factor of 3 from the origin becomes (6,3), (12,3), and (6,9). The sides triple in length, but the angles stay exactly the same.
What mistakes usually trip students up during coordinate plane dilations?
Most errors come from rushing the multiplication or mixing up the center of dilation. Here is what to watch for:
- Multiplying only one coordinate instead of both x and y.
- Forgetting that a center of dilation other than the origin requires shifting points before and after scaling.
- Confusing enlargement with reduction. A scale factor between 0 and 1 shrinks the figure, even if the exercise asks for an enlargement.
- Drawing the new shape without checking that corresponding sides remain parallel to the original.
If you catch these early, your grid work stays clean and your answers match the expected proportions.
How can you practice scale factor exercises without getting stuck?
Start with simple polygons on graph paper before moving to complex figures. Trace your pre-image lightly so you can compare it to the enlarged version. Always label your points with primes so you know which coordinates belong to which shape. If you need extra repetition, working through a worksheet that focuses on similar triangles helps you see how proportional sides behave across different orientations. You can also apply the same multiplication rules to quadrilaterals by reviewing how rectangles change under proportional scaling. When you want to see how these grid skills transfer to real drafting tasks, try a practice set built around architectural sketches to connect classroom math to measurable drawings.
When should you use a coordinate plane instead of freehand scaling?
Grid-based enlargement removes guesswork. You use it when precision matters, like checking homework answers, preparing for standardized geometry tests, or laying out proportional designs. The coordinate system forces you to track exact distances, which makes it easier to spot calculation errors. Freehand sketching works for rough ideas, but coordinate plane exercises give you a reliable way to verify that every side length multiplied correctly and every angle stayed fixed.
What is a quick way to check if your enlargement is correct?
Run through a short verification routine before moving to the next problem. Measure two corresponding sides and divide the new length by the original. The result should match your scale factor. Check that the slopes of matching sides are identical. If your center of dilation is the origin, draw a straight line from (0,0) through each original vertex. The enlarged vertex should sit on that same line, just farther out. This alignment test catches misplaced points instantly. For additional reference material on geometric transformations, you can review the transformation lessons on Khan Academy.
What should you do next to build confidence?
Keep your practice focused and measurable. Follow this short routine before your next study session:
- Print a blank coordinate grid and plot a simple four-sided shape.
- Choose a scale factor of 2 or 3 and multiply every coordinate by hand.
- Plot the new points and draw the enlarged figure with a different colored pencil.
- Verify parallel sides and check one slope calculation to confirm accuracy.
- Repeat the process with a center of dilation at (1,1) to practice shifting coordinates.
Stick to five problems per session. Track which step slows you down, adjust your method, and move to larger polygons once your multiplication and plotting feel automatic.
 Mastering Scale Factor Word Problems
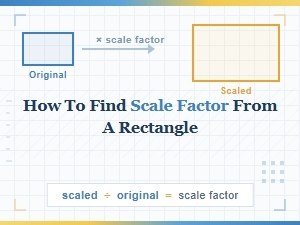 A Guide to Calculating Scale Factor for Rectangles
 Identifying the Scale Factor in Similar Triangles
 Mastering Scale Factors in Architectural Drawing
 Exploring Scale Factors in Middle School Geometry
 Understanding Map Scale Factor Calculations